
Whether you’re a car enthusiast or a novice, performing regular maintenance is crucial to extend the lifespan of your vehicle and ensure a safe driving experience. In this guide, we’ll walk you through step-by-step instructions on how to perform a vehicle maintenance service. If you’re searching for “car servicing near me,” look no further, this guide has got you covered.
It’s essential to understand why regular servicing is vital. We’ll explore the impact of routine maintenance on fuel efficiency, overall performance, and the long-term health of your vehicle. By the end of this section, you’ll have a clear understanding of why investing time and effort into maintaining your car is a smart decision.
Essential Tools and Supplies
To perform a successful vehicle maintenance service, you need the right tools and supplies. In this section, we’ll provide a detailed list of essential items, from basic hand tools to specialized equipment. Whether you’re planning to perform an oil change or replace air filters, having the correct tools on hand is crucial for a smooth and efficient process.
DIY Oil Change – Step by Step Guide
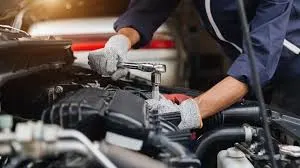
The DIY oil change is a crucial process while performing a vehicle maintenance service. Changing the oil in your car is a fundamental task that directly impacts the engine’s health and overall performance. Follow these step-by-step instructions for a successful DIY oil change:
- Gather the Necessary Tools and Materials
Before starting the oil change process, make sure you have all the required tools and materials. This includes an oil filter wrench, an oil drain pan, a socket set, a funnel, a new oil filter, and the appropriate amount and type of oil as recommended by your vehicle’s manufacturer.
- Prepare Your Vehicle
Park your car on a level surface and engage the parking brake. It’s essential to ensure the vehicle is secure and won’t roll during the oil change. Allow the engine to cool down slightly to prevent burns from hot oil.
- Locate the Oil Drain Plug
Refer to your vehicle’s owner’s manual to locate the oil drain plug. It is typically situated on the bottom of the engine oil pan. Place the oil drain pan beneath the drain plug to catch the used oil.
- Remove the Oil Drain Plug
Using a socket wrench, carefully loosen and remove the oil drain plug. Be cautious, as the oil might be hot. Allow the used oil to drain completely into the oil drain pan.
- Remove and Replace the Oil Filter
Using an oil filter wrench, remove the old oil filter. Before installing the new filter, apply a small amount of oil to the rubber gasket to ensure a proper seal. Screw on the new oil filter hand-tight.
- Replace the Oil Drain Plug
Once the old oil has drained completely, replace the oil drain plug and tighten it securely. Be careful not to overtighten, as it may damage the threads.
- Add New Oil
Using a funnel, pour the recommended amount and type of new oil into the engine. Refer to your vehicle’s owner’s manual for specific oil capacity and viscosity requirements.
- Check the Oil Level
Start the engine and let it run for a few minutes. Turn off the engine and wait for a minute to allow the oil to settle. Check the oil level using the dipstick and add more oil if necessary.
- Dispose of Used Oil Properly
Dispose of the used oil and the oil filter in an environmentally friendly manner. Many auto parts stores and recycling centers accept used oil for proper disposal.
By following these step-by-step instructions, you’ll successfully perform a DIY oil change, contributing to the overall health and longevity of your vehicle. Remember to adhere to safety precautions and consult your vehicle’s owner’s manual for any specific guidelines or recommendations.
Air Filter Replacement Made Easy
A clean air filter is essential for optimal engine performance and fuel efficiency. In this section, we’ll show you how to replace your car’s air filter, emphasizing the significance of this often overlooked maintenance task. Following our simple instructions will not only improve your vehicle’s performance but also contribute to a cleaner environment.
Checking and Rotating Tires for Extended Lifespan
Tire maintenance is a key aspect of vehicle safety and longevity. This section covers the proper way to check tire pressure, tread depth, and how to rotate your tires for even wear. By following our guidelines, you’ll not only enhance your car’s performance but also ensure a smoother and safer ride.
The Importance of Regular Brake Inspection
Brake maintenance is crucial for your safety on the road. We’ll guide you through the process of inspecting your brakes, identifying warning signs of brake wear, and understanding when it’s time to replace brake pads or discs. A well-maintained brake system is essential for responsive and reliable stopping power.
Routine Fluid Checks and Top-ups
In this section, we’ll cover the importance of regularly checking and topping up essential fluids such as coolant, transmission fluid, and brake fluid. Maintaining the proper fluid levels is vital for the smooth operation of various vehicle components. Our step-by-step guide will make this routine task a breeze.
Scheduling Regular Check-ups with Professional Mechanics
While our guide focuses on DIY maintenance, it’s crucial to schedule regular check-ups with professional mechanics. We’ll discuss the importance of professional inspections, share tips on finding reliable auto service centers, and explain why a combination of DIY and professional maintenance is the key to a healthy and reliable vehicle.
Conclusion
In conclusion, embrace the satisfaction of being a proactive car owner who takes charge of their vehicle’s well-being. Regular maintenance is not just a task, it’s a commitment to the longevity and performance of your car. So, the next time you search for car servicing near me, you’ll do so with the confidence of knowing that you’ve mastered the essentials of vehicle maintenance.